Friday, November 25, 2011

Christmas Cookie Tutorial - Grandmas Italian Biscotti

My first ever Christmas cookie tutorial was for the Italian Fig Cookies and I realize it is probably not for everyone. Kinda hard to want to make a cookie that is expensive, messy and takes a lot of time without really tasting them first. They ARE fabulous and I have been eating them right out of the freezer ever since I posted it, but I understand.


So, this recipe gets so many rave reviews and I have made them thousands of times, that I decided I would share it also. I just made a batch for a girlfriend who loves them and she just lost her mother....I took them to her at the funeral service today. Her face lit up.


Whenever there is an event that needs homemade baked goods everyone looks at me....I in turn say "yes, I'll make the biscotti!" I made a batch for another girlfriend who lost her son and she laughed and then she cried. Last year I was facing hip surgery and was not physically able to stand in the kitchen and make any Christmas cookies. When my pastor found out he was so disappointed, because he is probably my number one fan of these cookies and always so appreciative and complimentary. I felt so bad that I went home and made a batch just for him and gave them to him with a jar of my homemade strawberry jam. He was a happy Pastor! He tells me that every time I make them they just get better and better (he knows just what to say, doesn't he?!)


Here it is then, easier than the fig cookies and unlike the ones in the glass jar on the counter in the coffee shop, which are hard as rocks, you have to dunk them in your coffee to be able to bite into them and they taste just okay......

Put the following in an electric mixer and mix.....

6 eggs
5 tsp. baking powder
1 tsp. vanilla
Grated orange or lemon peel (about 1/2 of the outside of the orange or lemon)
Overflowing cup of sugar
************************** 
Add ½ pound (2 sticks) melted butter
5 – 5 ½ cups flour
Mix till the dough looks like this.....


If the dough sticks to your fingers, just add more flour. It should be pliable and not sticky.
Form the dough on an ungreased baking pan into 4 -  2” wide x ¾” tall, by 14” long logs. I really did measure these at first because it insures they all fit on my pan!

Bake at 350 for 20 minutes. They will come out all puffed up and golden....leave the oven ON

Let cool. They tend to meld together on the pan so just take a spatula and separate them and loosen them from the pan. Be careful not to break or split each log....they will be cut on the diagonal next.


Slice on the diagonal and then rebake for 10 minutes.


Drizzle the top with my all purpose, wonderful frosting with either lemon extract or anise extract added and yum....the finished product!
                                                                                                   2 2/3 cups confectionary sugar
2 tablespoons vegetable oil
1 tablespoon flavoring (almond, lemon, anise), optional
Hot water

Combine all ingredients except water. Slowly add a little hot water till frosting is smooth.


Thursday, November 24, 2011

November is National Diabetes Month

November is National Diabetes Month and this is in response to Etsybloggers question: Have you ever been touched by Diabetes?

Four years ago, my grandaughter Cassidy, at the age of two, was diagnosed with Juvenile Diabetes. Never knowing anything about it or the warning symptons, I was totally shocked. I had been babysitting her at my house and she was especially cranky and tired and hungry and her diaper was constantly full. I was scared she was sick with something but never imagined Diabetes. When my daughter took her to the pediatrician he knew immediately and sent them to the emergency room. Her sugar level was up over 600, which is pretty high for a two year old.

We knew our lives were changed forever with this news and it was heartbreaking for a two year old to have to deal with this, but this was not the first time a major illness had struck the babies of the family. My nephew was born with congenital heart disease, diagnosed as an infant, and after 25 years of living with a pacemaker and other problems, he passed away. My son was born at 28 weeks because I had severe preeclampsia and he has cerebral palsey in his legs and tone in his arms and legs. He weighed 1 lb. 10 oz. at birth. He is 13 now, very mature and witty and an all around great kid and you would never know he ever had anything wrong.

So that is three babies in our family with some major afflictions. My nephew was a very charming, witty and handsome boy (my son reminds me of him) and he touched many many lives with his personality and who he was. My son is very mature for his age and is constantly teaching my husband and I things we probably should already know! My granddaughter is 6 now, wears a pump and is doing everything a six year old first grader should be doing. She is very smart, reads whole books without help and just played Farmer Mack Nugget in the Night Before Thanksgiving play at her school.

The two of us grandmas had to learn how to care for Cassidy and are currently the only two that can watch her because of that. First we had to learn how to calculate and then administer with a needle, the insulin for Cassidy. It was not fun injecting a 5" needle into the arm or leg of your sweet little granddaughter! Now the pump does it all and although it is scary and I still don't know everything I need to know about it, she can visit and stay overnight and eat whatever she wants (which is of course all the wrong things at NaNa's house!).

The JDRF (Juvenile Diabetes Research Foundation) is constantly doing research and are currently researching an artificial pancreas. Here is the link to their website if you want to know more....
http://takeaction.jdrf.org/site/MessageViewer?em_id=50284.0&dlv_id=36404

My daughter and her husband participate in the local walk for diabetes every May which helps the research through donations.

I'm not sure why those closest to me, and especially the babies, have been afflicted so, but the Lord has helped me through all this because I know He has His hand on it all and He is in control of it all. The reasons don't matter right now....sometimes he allows these things so that we draw closer to His care and protection...........

Tuesday, November 15, 2011

Christmas Cookie Tutorial - Italian Fig Cookies - Cuccidari

Pronounced "gooch-a-dah-de", these fabulous Italian fig Christmas cookies take me back to my childhood when my mother used to make them every year. She would fill pans and pans of them, baked and frosted, under the dining room cabinet for safe keeping....not so safe as I used to sneak one whenever I could. I have since taken over the baking of them and have been doing it for about 35 years (wow! I never counted the years before!) My daughter Jena has started to make them and found out quickly my warning to her and now to you....they are very time consuming, sticky, messy, and a little expensive to make but OH, ARE THEY WORTH IT!! Everytime I make them someone wants the recipe, but soon find out that there is so much more to just me handing them the ingredients list and directions. You have to SEE how to do it to make them come out right. My girlfriends have requested to come over some afternoon (little do they know you need a good part of the day!) so we can make them and they can learn....well girls, here it is in color, step by step! Have patience and enjoy!
Here is the ingredients list. Pictures and step by step directions to follow:

Preheat the oven to 425

Dough:
1 ½ cups shortening – melt in microwave
1 cup sugar
2 eggs
½ cup water
5 tsp. baking powder
2 tsp. vanilla
5 cups flour, sifted

Filling:
1 pkg. (1/2 -1 lb.) dates, chopped
1 box raisins (15 oz.)
1 lb. fresh figs
½ lb. chopped walnuts
1 lb. jar orange marmalade
¼ - ½ rum or whiskey or 2 tsp. rum extract (optional)

First get all your ingredients ready for the filling.....


Chop the figs a little at a time in a food processor. They can be quite tough and could burn out your motor if you do too many at once!


They should look like this when you are done....


Add the figs and all the other ingredients for the filling in a saucepan for the stove.....


Heat it through on medium low till it is soft and pliable and melts together a little. Remove from heat.


Get all your ingredients for the dough together.......


Melt the shortening in the microwave for about 1:30. Whisk out any remaining lumps. When that is cool add the sugar and eggs....

Stir this together and then add the water, baking powder, vanilla and flour. Mix the dough in the mixer till it is soft and pliable. If it is too greasy, add a little more flour....


The dough should look like the picture above. Okay, that was easy! The filling and the dough are made. Now comes the fun part! Set up all you will need to roll out the dough and make the cookies.....

Flour your cutting board continuously throughout the whole rolling process. Roll a piece of dough approximately 10" long by 6" wide
and cut the edges and top and bottom straight.....


Put the filling down the middle of the dough from top to bottom. The tricky part of this section of making the cookies is to decide how much filling to use so that you don't run out before you get to the end of your dough or your dough doesn't run out before you get to the end of your filling! If you have leftover dough, you can roll it out, sprinkle sugar and cinnamon on it, roll it and bake it......yum!


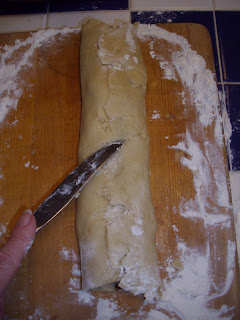
With a butter knife form the dough on either side over the filling and seal the middle and ends. The dough is quite pliable and can be blended together to close the seam....


With a sharp knife cut the tube on the diagonal about every 3/4". Place the cookie seam down on the cookie sheet to bake. No need to grease the pan....there is plenty of shortening in there for that!


Bake them at 425 degrees for 8 minutes till golden brown.....this recipe makes about 7 dozen cookies. They freeze beautifully. I usually freeze them once they are cooled in either freezer bags or large pans with foil. When I need some to give as a gift or to serve to guests (or just eat, and sometimes that is right out of the freezer!), I defrost them and frost them and they are as fresh as the day I made them.....                  


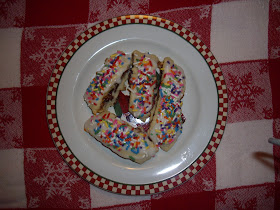
Ta Da!! Here is the finished cookie!


You may be wondering why there aren't Christmas sprinkles on them......all I can say is that is how my mother did it and who am I to mess with tradition?! I thought maybe you would want the frosting recipe too...it is the best and easiest one I know and I use this on all my Christmas cookies...even my cutouts.

Frosting

2 2/3 cups confectionary sugar
2 tablespoons vegetable oil
1 tablespoon flavoring (almond, lemon, anise), optional
Hot water

Combine all ingredients except water. Slowly add a little hot water till frosting is smooth.

Happy Baking and I would love your comments if you try these cookies, if the tutorial was easy to follow (it is my first!) or not, or anything else you would like to say!
AnnMarie


Tuesday, November 8, 2011

The Tradition of Christmas Tree Ornaments and Etsy Specials

Christmas is Coming!

Around this time of year when the retailers start stocking their holiday decorations, I find myself mostly drawn to the ornament displays. I have always had a thing for Christmas tree ornaments....my Mother gave each of us children a new one every year, a tradition that I have done over the years for my daughters and son, and now my grandchildren. I love them so much that I have several themed trees around my house each year for Christmas to display my collection. I have a Victorian tree, a country tree with lots of snowmen, a doll tree, and then the main tree with all the ornaments I have collected or been given over the years. My husband and son each have their own trees too, tailored to their individual likes...which is mainly superheros! My most treasured ornament from my youth is the angel in the middle of the picture, dated on the back 1969. The other two were handpainted by my mother in her ceramics class when that was THE thing to do! They date back to the late 1970's.


I started making my own ornaments a few years ago when I became The Button Lady trying to find anything I could to put vintage buttons on! I love the idea of a photo frame ornament hanging on the tree....each year when you pull it out it is like looking at old pictures from the past. There could be many years of your childs or pets life represented on the tree. All the ornaments I make are photo ornaments and have either vintage buttons, puzzle pieces or both on them.
Till December 10th I am running a holiday special in my Etsy shop, The Button Lady.....
****************************************************************************
HOLIDAY SPECIAL UNTIL DECEMBER 10TH - Buy one or more ornament in the same order and pay shipping only on the first one. Shipping on each additional is FREE.
****************************************************************************
You can find them at http://www.thebuttonlady3.etsy.com/ or on my mini sidebar of the shop. Here is a picture of most of them together....


I am  offering another special in The Button Lady shop on Etsy for button hair accessories. Great for stocking stuffers! When I first started making the headbands and barrettes I wasn't sure how they would be received. My daughter is a hair stylist at an upscale salon in our area and she took them there to sell. The other stylists and women clients went crazy for them. They are so cute for girls, teens and women.
****************************************************************************
STOCKING STUFFER SPECIAL UNTIL DECEMBER 10TH - Buy one or more hair accessory in the same order and pay shipping only on the first one. Shipping on each additional is FREE.
****************************************************************************
Here is a sampling....


Happy Shopping this Christmas season!
AnnMarie

Thursday, November 3, 2011

An Ode to Fall

My Favorite Memories of Fall

When I lived in Williamson, New York, I lived in a 1900's farmhouse literally in an apple orchard. The house was formerly a migrant house for when they came and still come every year from the south to pick the apples. There was a row of  apple trees on  my property line, so when we bought the house we made a deal with the apple farmer instead of cutting them down. He would take care of them and take the apples and we would be able to go into any part of his orchards and pick whatever apples we wanted. What a deal that was!  I even had an orchard lane on one side of my house flanked with poplar trees that led back to acres and acres of apple trees. I used to look so forward to Fall when the leaves from those trees turned the most gorgeous color of yellow. I also went crazy making any apple recipe I could find. I loved to go pick the 20 oz. apples for pies. The farm market was across the street from me so I got my fill of vegetables and apples three seasons of  the year.

One year before I had children my husband and I went up to the Berkshires where my college roommate owned an inn. We decided to try horseback riding one day. Three hours later and a runaway horse (mine!) we came back exhausted but exhiliarated. The thing I remember most is that in those Bershire hills the leaves were pink and purple. Really! I had a pink and purple earring on which got brushed off as I passed by a tree limb. I got off my horse to try and find it but it was lost forever, blending in all those gorgeous leaves!

One of my favorite traditions to do in the Fall is to gather the most perfect yellow and red and orange leaves and iron them between waxed paper. Then I would scatter them on my dining room table for decoration. So pretty! I even made a wreath out of them one time. Another tradition is to make my pumpkin bread and pumpkin cookies and apple crisp (the recipes are in an earlier post!).  I usually decorate the main floor of the house for Fall too. It is my most favorite season in Upstate New York. The colors and smells, the leaves and the acorns, the pumpkins and gourds are just good for the soul and remind me how creative and good our Lord is!


When my kids were little I did all the typical things for them and with them in the fall, even making the mistake one time of taking them to a haunted hayride! I made all their costumes, we carved pumpkins and we jumped in the leaves. We would go to the local farm market Fall events and have caramel apples. I am looking forward to when I can do all that again with my grandchildren.

Fall is also the time that I start making my Christmas cookies. November 1st I start. I make them and freeze them unfrosted and when the time comes to start giving them away as gifts, which could be early December, I am ready. I just have to defrost them as I need them, frost them, put them in a nice tin and there is the gift.....one of the best gifts of the season I can think of!

If I am ambitious someday maybe I will post some of my most prized Christmas cookie recipes....would anyone be interested in that?
Have a wonderful evening....
AnnMarie

This is an Etsy Blogger team post
To read my fellow EtsyBloggers team posts for this carnival- visit here
http://etsybloggers.blogspot.com/2011/10/etsybloggers-blog-carnival-for-103111.html