Tuesday, June 30, 2015

Strawberry Pretzel Dessert Recipe

Oh, sweet strawberries, salty pretzels and cream cheese dessert......where have you been all these years since the 80's?


Apparently these days on Pinterest!

I made this dessert a lot in the 1980's as a young mother with a passion for baking and making desserts. It was a favorite go-to recipe and a real crowd pleaser.

Apparently it still is!

I lost track of my recipe and just how good this dessert is until I had it again recently at a graduation party.

Since it is strawberry season right now, there is no better reason than that to make it for our church picnic.

Not a very pretty dish for a picture but I put it in a foil pan
to take to church and not worry about my dish. I am very protective
of my baking dishes!
After finding this long lost love of mine after so many years, I really don't want to share the eating of it! But, it is for church after all :-)

I do want to share it with you though, in case you have never heard of this fabulous dessert!


I had to cheat and get a pic online because I couldn't cut into mine!


Strawberry Pretzel Dessert Recipe
 
Prep time: 
Cook time: 
Total time: 
Serves: 12
 
Ingredients
  • 2 cups crushed pretzels
  • ¾ cup butter, melted
  • 3 tablespoons white sugar
  • 1 (8 ounce) package cream cheese,
  • softened
  • 1 cup white sugar
  • 1 (8 ounce) container frozen whipped
  • topping, thawed
  • 2 (3 ounce) packages strawberry
  • flavored Jell-O®
  • 2 cups boiling water
  • 2 (10 ounce) packages frozen
  • strawberries
Instructions
  1. Preheat oven to 400 degrees F (200 degrees C).
  2. Stir together crushed pretzels, melted butter and 3 tablespoons sugar; mix well and press mixture into the bottom of a 9x13 inch baking dish.
  3. Bake 8 to 10 minutes, until set. Set aside to cool.
  4. In a large mixing bowl cream together cream cheese and 1 cup sugar. Fold in whipped topping. Spread mixture onto cooled crust.
  5. Dissolve gelatin in boiling water. Stir in still frozen strawberries and allow to set briefly. When mixture is about the consistency of egg whites, pour and spread over cream cheese layer. This part took awhile to set for me. Refrigerate until set.
Some tips from my source*
 
TIPS:
1.  Be sure to use a food processor to chop those pretzels nice and fine if you don’t like the taste of crunchy pretzels. 
2.  For easier layering, try to let the layers chill in the freezer before adding the next layer.
3.  Be sure to go all the way to the edge of your dish with the cream cheese mixture.  This will keep the jello layer from seeping through and making the crust soggy.


Enjoy!

AnnMarie

I am linking up with these fun blog parties:
Tasty Tuesday
Show and Share
Roses of Inspiration
Coffee and Conversation
What's It Wednesday
Thursday Favorite Things Blog Hop
Share Your Cup Thursday
Home and Garden Thursday


Monday, June 29, 2015

Meet and Greet ME!

Jann at Have a Daily Cup of Mrs. Olson is having a meet and greet through the blog world. She invited those of us that couldn't make it to her in-person meet and greet in her home in the Midwest to write a blog about ourselves, what we love and what makes us happy, so we could get to know each other better.

I decided to do mine in a pictorial view of what I love most. There is my faith and family and friends and then there are those things that are just ME...

First in my life....

Couldn't make it through a day without Him
 
My family...

My husband Frank, me, son Michael, daughter Jena
 
Daughter Candice
 
Grandson JC and Granddaughter Chloe

Granddaughter Cassidy


And friends....


Bonnie and I knit, chat and drink decaf together!
 
All 6 of us celebrate each others birthday together. We always
have the best time.
I love....

I have to have a container of my homemade snack around at all times!
Banana chips, mini chocolate chips, wasabi peas, coconut, raisins, peanuts
 
 
I love being by the water.
 
The Forsythia blooming in June makes my heart sing!


And the lilacs bring back happy thoughts of my
farmhouse in the apple orchard
 

This Orange Blossom in full bloom makes me happy
 

I love waking up to this view every summer morning....

 
And this in the winter.....
 
I am a true picker, junker, antique hunter


I buy it, sell it and decorate with it.
Decorating is a passion of mine.


I love coming home with a huge haul of goodies.
 
 
Baking is another passion of mine and I am not afraid to try
unique things. These are chocolate avocado cookies.
 
 
I used to craft in my 20's and am now just trying my hand at
DIY again.
 
 
I am currently focused on stenciling.
 
 
Fall is my favorite season and I love traveling to Naples, NY
to smell the concord grapes on the vine.
 
 
I love decorating for Christmas.
 

There is so much more but I will end with this last picture. You will just have to sign-up by email to get all my posts which include a little bit about me in each one! And click over to Jann's party where you might find other bloggers you know that you can get to know better.
 
 
I just love cats and this is my beautiful Maine Coon kitty
Miss Kitty.
She passed away in February and so I am looking forward
to this Fall when I will get another kitty.
 
 
AnnMarie xoxo
 
 
I am linking up with this fun blog party:


Wednesday, June 24, 2015

My Favorite Thrift Store is Closing!!

I am so sad. All of the Volunteers of America Thrift stores in Upstate NY will be closing by the end of September.

I got the email yesterday.

Today I had to go to get what I could because they are not accepting anymore donations. What is there is all there is and will be. Kinda like the first day of a garage or estate sale. You have to get first picks! You know what I mean if you are a thrifter.

I would say I did pretty good.


The prize, to me, is the printers drawer. Something I have been wanting forever although I don't have anywhere in my home to display it. I am keeping it for awhile and savoring the fact that I got it for $4!


The drawer pull has Hamilton on it, number 183.

 
The first thing that caught my eye was the cute owl pitcher. Dark chocolate brown and unique.
 
The planter with the Scottish Terrier's is a McCoy. Some vintage items are chipped and not anywhere near perfect but so worth picking up anyways. This one has an ear missing on the far right doggy with a big chip behind it. Hey, a nice fluffy plant will hide all that. I thought it was so special!


The two nesting bowls are Hall's Superior Autumn Leaf pattern. They are great sizes and remind me of my early days of collecting. I inherited an Autumn Leaf ball shaped pitcher from my aunt. I've since sold it.


The pie plate is also reminiscent of my early collecting days as I had one just like it with a cherry top. It is ceramic and was available to glaze and paint at the many ceramic classes available in the 80's.
 
 
Oh, the deer! I just gravitate to anything deer and this one is so special. It is sparkly and I think it is made of paper mache. That would explain how light it was when I picked it up, thinking it was a cheapy $1 store item. To my surprise there is a gold sticker with Made in Taiwan on the bottom. 
 
 
Sometimes I am not sure there is a market for some items I pick up. The Hallmark Grandparent's photo album is marked 1984  and it is old style with large pages with plastic coverings. I am hoping not everyone uses Instagram or their phones to store photos, and like me, like physical photos to look at in unique albums! The little folk art pail is so cute and very rusty, dented, and full of charm.


This framed picture caught my eye for it's unique subject and black and white photo. I will have to research it to find out exactly what is going on in it! 
 
 
The frame was worth the buy. It is wood and very old looking.
 
 
I am so sad that my favorite thrift stores are closing! Declining sales is the reason. I did get to use all my rewards points, my senior discount and my tax exempt status on this sale so I did very well. There are three other VOA's in my area that I have to get to before all the good stuff is gone.
 
I've got garage and yard sales to pick for the summer but where will I pick all winter? I have to find some new places to feed my addiction, I mean, love for vintage.
 
In the meantime, I will be busy listing all these great finds in my Etsy shop.
 
Do you have a favorite, go-to thrift store?
 
AnnMarie xoxo
 
I am linking up with these fun blog parties:


Monday, June 8, 2015

On a DIY Roll!


DIY projects, up-cycling and repurposing are pretty new adventures for me and I have had more fails than successes.

I crafted in the 1980's, which included stenciling, sewing and tole painting and a little of everything else in between. I am not really interested in the sewing or painting or everything else anymore but my love for stenciling has been renewed!

I have my blogging friend Diana, from Adirondack Girl @ Heart to thank for that. She featured some stencils from Decor Art and the great things she made from them on her blog. Click and visit her for all her own great DIY ideas.

I quickly clicked over to the website and ordered three different stencils from the Americana Decor Collection. They are very inexpensive and great quality. There are seven different collections to choose from!

I already had the brushes (from the 80's!) and lots of paint.

I was hooked.

My first project with the stencils was a small wood table my husband got for $5 at a yard sale. He wanted something small that would fit against the wall for materials for our community theatre. I made him agree that it was going to be my first attempt at stenciling again after 30 years. It was ugly and needed a makeover before it went to the theatre!


I was anxious to try out the Distressed Harlequin and Olde World Numbers stencils I had bought.
I painted the whole table with Oatmeal Chalk Paint, distressed it lightly and then stenciled the Distressed Harlequin in Cascade, a pretty aqua color, on the top.


Then, dying to try out the numbers, I stenciled No 201, also in Cascade, on the bottom, which is the address to the theatre. It is a little off center but for my first try I decided to leave it.


I buffed the whole table with MinWax Paste Finishing Wax and it was done!


Here it is at the theatre with materials on it. My husband had both shelves filled but then took most of it off. He said I did too good of a job to cover it all up. Sweet!


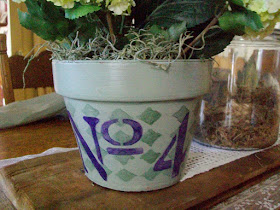
I needed a gift for my friend Tree's (nickname for Theresa!) birthday and I hadn't gotten enough of trying out the Harlequin or numbers stencils yet. I asked her what her favorite flower, favorite number and favorite color was. I had an idea.

 
I painted a terra cotta pot in a pale sage green except for the inside. I wasn't worried about the edges either because they would be covered up.


I started stenciling the Distressed Harlequin in a darker shade of sage onto the pot and quickly realized that it was going to be harder than I thought. I was so excited to order stencils that I didn't realize that there is a collection specifically made for pots and rounded things! The one I was using is quite stiff. I made it through though, after a few attempts. Learn a lesson ahead of time from my faux pas!

 
I struggled pretty much the same through adding the No 4 but I got through that too.
 
 
Her answers to my favorites questions? She loves Hydrangeas, dark purple and the number 4, her birth date. I was happy how it all turned out and so was she!


My last DIY is not a stenciling project but rather an idea I got from my friend Susan. She and her husband Ken are quite talented in all areas of home décor and do most of the work themselves. I was shopping with her one day while she was looking for a light for over her new bathtub. Nothing was just right that day. Later I got a text from her with a picture of an old rusty birdhouse she had in her garden, swagged over the tub with a light bulb in it. It looked fabulous! I wanted one too!


Lucky for me I soon found my own vintage, rusty birdhouse. It didn't take long to decide that it would be the side porch hanging light I had always wanted.
 
I filled the bottom with faux ivy vines, got a hanging pendant light from Lowe's, and in about 20 minutes had a great light fixture and I did it myself! It was as simple as fitting the pendant light between the wires on the top of the cage and then hanging the cord on a hook, creating a swag over to the wall and stapling it down.


The birdcage was already painted white, distressed and a little rusty.


It even has the porcelain water cup on the side.


Now that I got that out of my system, back to what I do best! Thrifting and picking and garage saling!
 
I may get brave and try another stencil project. I still have a great Vintage Keys stencil to try out.
 
 
What DIY projects are you good at?
 
 
AnnMarie xoxo
 
 
I am linking up with these fun blog parties this week: