Here is the ingredients list. Pictures and step by step directions to follow:
Preheat the oven to 425
Dough:
1 ½ cups shortening – melt in microwave
1 cup sugar
2 eggs
½ cup water
5 tsp. baking powder
2 tsp. vanilla
5 cups flour, sifted
Filling:
1 pkg. (1/2 -1 lb.) dates, chopped
1 box raisins (15 oz.)
1 lb. fresh figs
½ lb. chopped walnuts
1 lb. jar orange marmalade
¼ - ½ rum or whiskey or 2 tsp. rum extract (optional)
First get all your ingredients ready for the filling.....
Chop the figs a little at a time in a food processor. They can be quite tough and could burn out your motor if you do too many at once!
They should look like this when you are done....
Add the figs and all the other ingredients for the filling in a saucepan for the stove.....
Heat it through on medium low till it is soft and pliable and melts together a little. Remove from heat.
Get all your ingredients for the dough together.......
Melt the shortening in the microwave for about 1:30. Whisk out any remaining lumps. When that is cool add the sugar and eggs....
 |
Flour your cutting board continuously throughout the whole rolling process. Roll a piece of dough approximately 10" long by 6" wide
and cut the edges and top and bottom straight.....
Put the filling down the middle of the dough from top to bottom. The tricky part of this section of making the cookies is to decide how much filling to use so that you don't run out before you get to the end of your dough or your dough doesn't run out before you get to the end of your filling! If you have leftover dough, you can roll it out, sprinkle sugar and cinnamon on it, roll it and bake it......yum!
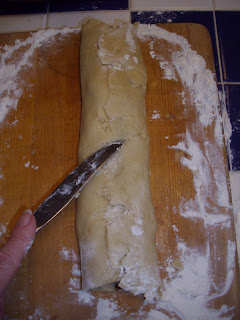
With a sharp knife cut the tube on the diagonal about every 3/4". Place the cookie seam down on the cookie sheet to bake. No need to grease the pan....there is plenty of shortening in there for that!
Bake them at 425 degrees for 8 minutes till golden brown.....this recipe makes about 7 dozen cookies. They freeze beautifully. I usually freeze them once they are cooled in either freezer bags or large pans with foil. When I need some to give as a gift or to serve to guests (or just eat, and sometimes that is right out of the freezer!), I defrost them and frost them and they are as fresh as the day I made them.....
Ta Da!! Here is the finished cookie!
You may be wondering why there aren't Christmas sprinkles on them......all I can say is that is how my mother did it and who am I to mess with tradition?! I thought maybe you would want the frosting recipe too...it is the best and easiest one I know and I use this on all my Christmas cookies...even my cutouts.
Frosting
2 2/3 cups confectionary sugar
2 tablespoons vegetable oil
1 tablespoon flavoring (almond, lemon, anise), optional
Hot water
Combine all ingredients except water. Slowly add a little hot water till frosting is smooth.
Happy Baking and I would love your comments if you try these cookies, if the tutorial was easy to follow (it is my first!) or not, or anything else you would like to say!
AnnMarie


Mmmmmm... thank you for sharing! I think this will be the first Christmas cookie this year~
ReplyDeleteLove your pictures, too!
They look delicious even though I'm not a fan of figs! I'm waiting for your biscotti recipe!
ReplyDeleteLooks yummy!
ReplyDeleteBest christmas cookie ever! If mom doesnt make them it just isnt christmas!
ReplyDeleteLove, Jena
I am so happy to have found this....my grandmother, who has now past, made these for years.....I always remembered the name cuccidari...NEVER knew how to spell it, because I always heard it pronounced, never saw it spelled. Thank you!!!!! This brings a flood of memories for me.
ReplyDeleteOh, WOW! These sound incredible! I would love them! Some day, maybe, when I am feeling VERY ambitious, I'll give them a try!
ReplyDelete