Tuesday, March 22, 2016

DIY Miniature Fairy Garden Terrariums


This post is about my newest passion....making fairy garden terrariums.


It seems that when I see something I love, I have to make one and give it as a gift. It all started when my husband gave me a fairy garden kit for Christmas. It came out so cute.


It sits on the kitchen window sill so I can see it whenever I am at the sink.


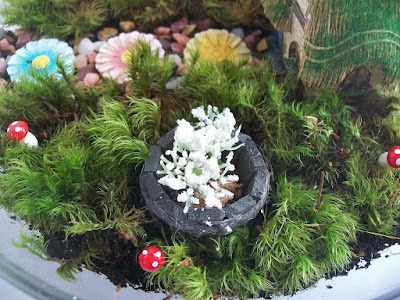
When my daughter saw it she said "I want one!". So I decided to try and make one for her for her birthday. The first picture and the one below are of the terrarium I made for her birthday.


Can you see the green watering can and spade?

When I started to gather supplies to make terrariums, I bought any and every jar or container I thought might work.  Any clear glass bowl, with or without a cover, will work. Make sure the jar you choose has a large enough opening so you can fit your hand inside to place the pretty accents! A covered jar works best to create the ecosystem contained in the jar that terrariums are made for. Of course I got them all at thrift stores for $1 or less. I gathered so many that I could make four  different ones for four gifts.


The other supplies needed are potting soil, activated charcoal (purchased in the pet area of a garden store), small pebbles (Lowes garden department), large stones or glass beads (from my stash), Spanish moss (any craft store), fresh moss, and your decorations...ie. fairy house, mushrooms, little accents, and of course a fairy. All of the supplies come in containers large enough to make five terrariums plus extra for more. Most of the houses, a fairy and the accent pieces you will see came from Jo-Ann's. The mushrooms were found at Michael's. Of course you can find more online.


The first thing to do is to wash and dry your container. I used an open container for demonstration purposes.

Soak the Spanish Moss in water.

Fill the bottom of your jar with the small pebbles.


Add a layer of larger stones such as river rocks, or the craft glass beads that come in a variety of colors. I chose a mix of blues for this one.


Put a layer of the wet Spanish Moss on top...


Then sprinkle on some activated charcoal....


Put a layer of the potting soil over that. You can be creative and make hills and valleys if you'd like and have room in your container.

Spritz the dirt with water to make it moist. This is the view from the side of the glass bowl.


I then pulled small pieces of the fresh moss from the bag I ordered (see link above). It came in a ziplock bag in one patch of moss. It was enough to make four terrariums.

I tucked each piece of moss into the dirt to create the yard and left the middle open for a path to the house. I spritzed the moss with water and then added my accents.....a daisy stepping stone path with a ladybug, a wooden barrel filled with flowers and some mushrooms scattered around. Of course the thatched roof cottage is the focal point. No fairies in sight though (couldn't find one small enough!).


I wanted to thank my dear friend Kim for always being so supportive of the things I do so I made a miniature fairy terrarium for her, just because.  It is in an apple shaped jar with a lid that has a stem on it.


What I didn't know, that Kim shared with me when she got this garden, is that our mutual dear friend Lora loves everything fairy! I was sick for her birthday party so hadn't been able to give her a gift yet, so guess what I made for her? Her terrarium is extra special because I found a small enough fairy to perch at the end of the path. This garden made it's debut in my last post.


I used terrarium moss for this one as opposed to live moss.


I just followed the same layering process for all of these. The fun is making them in
different shaped jars, using different stones and accents to make them unique.
You can even use an antique porcelain dish....


This one sits on my mantel in the parlor. Because it is open to the air it has to be spritzed every now and then. None of the terrariums should be put in direct light.

I hope you try one for yourself or a gift. They really are fun and easy to make.

The next thing I want to try is a fairy garden in my old dented, rusty galvanized bucket for outdoors this summer.

Stay tuned!

Source
One last tidbit....

In my last post I mentioned that our dear friends Karl and Diane are moving out of
state. We had them over to spend a day with them before they went on their way.

They brought me a going away gift and it couldn't be more perfect or more ME!


It is a Fenton and it is AQUA!!

I love it. I think it was Karl's mother's and I was so honored to have it passed on to me. I will treasure it always.

So, will you get into the world of fairies and invite them into your home or garden?

AnnMarie xoxo

I am linking up with these fun blog parties:


Friday, March 18, 2016

Five MORE Things....on Friday

Right after I wrote my 5 Random Things post I found five more things to share.


So, I am linking up with Five on Friday, hosted by Amy at Love Made My Home.


Monday was a great day and is my Number 1!


I have been looking for a new rug for my parlor because the one that was there was quite worn and almost 20 years old. I painted the walls cranberry to match the rug which made it hard to find a new rug with the right color.


The only picture I could find of the old rug is from a few Christmas' ago. It was an Aubusson rug with long fringe, which I grew to hate.


I looked online and finally decided on a burgundy rug from a large retailer. When it arrived it was Rust! Luckily for me, the UPS drop off is right up the street in an antique shop. When dropping it off to send it back I just casually asked if they had any large 100% wool rugs. There hanging in the corner was the perfect rug!


The owner offered to deliver it to my house, which is just down the street, so I could try it before I bought it. He actually brought it in, moved the old rug and laid it out for me. He has a flair for decorating and thought it matched although the color is burgundy, not cranberry. It turns out to be exactly what I had envisioned and I love it. It matches my chairs and window treatments and has transformed the look of the room.


I decided not to wait for my husband to see it because I knew he'd love it and leave it up to me anyways. The best part is that when I went to pay for it, I had a 10% off store coupon that was on the receipt I got for returning the first rug! You know that commercial with the woman just sighing at her newly remodeled kitchen and the daughter says "c'mon Mommy, turn off the light and let the kitchen get some rest"?? That's me....standing in the doorway, sighing at how gorgeous my new rug looks!


Number 2

Once the new rug was down, the blotchy floors were so much more apparent, especially in front of the window seat. I remembered a trick I used before in my dining room, which is good ol' olive oil.

The
Before


I sprinkled it on the floor right out of my olive oil bottle, rubbed it in with a paper towel.....


and ta da....


It filled in all the light stains enough to make it look so much better.


Number 3


I love getting decorating ideas from other bloggers and sometimes those ideas are "aha" moments. That is what happened when Carol at Art and Sand posted about how she has books all over her house. She had some fabulous wire baskets filled with them under her table and I loved the look. I bought one of those baskets last year and never did anything with it. Now it holds my grandchildren's books for when they visit, which were not being read because they were hidden in the toy chest. It sits on top of my "new" chippy stool that I am deciding whether or not I can sell!


Number 4


I also got inspiration for a Spring/Easter centerpiece from so many decorating blogs. This is my version of what I saw. I used my lace edged burlap runner from last year under an old pine plank. The slice of tree is actually from Target and the cloche was new at Christmas, from JoAnn's.


I painted some plastic eggs from Walmart with my "Cascade" chalk paint and then splotched on some white. The bird nest is from my yard and the deer is from my vintage deer collection.


Number 5

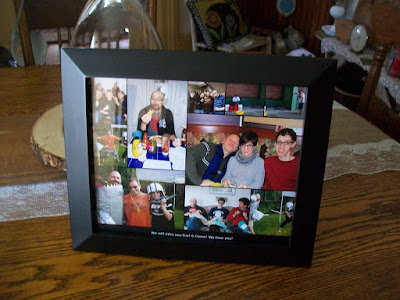
Our dear friends Karl and Diane are moving to North Carolina at the end of March. We have had some great fun and laughs with them and wanted to capture the highlights to give to them as a keepsake. Good old Walmart was there for me with their photo center machines that you can make a photo collage on. For $2.93 I made an 8 x 10 of the best pictures I could find. For $4 I found a really nice black frame. There you have it....a pretty nice going away gift!


Another week gone by and a busy weekend ahead......

Happy First Day of Spring, Sunday March 20th!!!!

AnnMarie xoxo

I am linking up with these fun blog parties:


Sunday, March 13, 2016

5 Random Things

There is lots going on all at once at my house but not one thing enough to write a post about.


I decided to show and tell you five random things I have been up to.


ONE...


I have been going fairy crazy lately, making fairy terrariums for gifts ever since I received a kit to make myself one for Christmas.


I plan on doing a tutorial post soon on how to make one, since they are easy and very cute. I have made five of them so far but I am going to show you the newest one I made for my sweet friend Lora for now.


It's a little hard to get a good picture but this little terrarium is a layered ecosystem all contained in a jar.


I also plan on making an outdoor fairy garden in a huge galvanized bucket I had filled with flowers last summer. There are so many cute houses and accessories available to make these sweet gardens and I have gotten most of mine at Michael's and JoAnn's.


I picked the house and fairy up recently at JoAnn's in anticipation of my garden. The Gnome I got at a new vintage store.


TWO...

We are making progress on our dining room (click to read my original post if you'd like).


Or I should say, my husband is making progress on our dining room. I have had a head cold/sinus infection for 3 weeks so it would not be good for me to be scraping wallpaper!


Two walls mostly done....


Still to do.....


Lots of furniture and stuff to move around with no where to put it! Still, the room feels so much bigger already!

THREE....

I saw this sign at a diner recently and knew I had to make one for our community theatre for the table we set our coffee and desserts on.

Theirs....


Mine....


FOUR...

I don't know where I saw this quote but I jotted it down on the back of a piece of mail. I just want to share it with you.

Life with Christ is
an endless hope:
Without Him
a hopeless end

FIVE....

At the end of last quarter we received this postcard from my son's high school counselor. He made the honor roll! He is a senior this year and we are busy planning his future!


Random is good sometimes....

What's new with you?


AnnMarie xoxo

I am linking up with these great blog parties:


Dishing It & Digging It

What'd You Do This Weekend?
Make It Pretty Monday
Let's Talk Vintage
Roses of Inspiration
Talk of the Town
Home and Garden Thursday
Share Your Cup
Thoughts of Home on Thursday
DIY Sunday Showcase


Wednesday, March 2, 2016

Thrifting on a Whim


There are all kinds of thrifting outings.

There's the planned, search the internet and newspaper for sales in your area and then hit every spot there is in one day, kind.


There's the huge show you have been waiting and waiting for, kind.


And then there's the thrifting on a whim. You know, when you had absolutely no plan to stop and hunt for anything but you did anyways. On a whim.


I had one of those kind on Sunday and it was a good one!


We had gone out to lunch to Dinosaur Bar-B-Cue in the city of Rochester. It is an Upstate New York restaurant chain with the best barbecue ribs and pulled pork. The one near us is located right on the Genesee River. We got a window booth with a great view.


I am sharing this fact because it adds to the full thrifting experience. It is always better to thrift on a full belly.

Full to the brim with Pig Salad (salad greens with pulled pork, candied walnuts and spicy blue cheese dressing), cornbread, fries and chocolate cream pie, we headed toward home.

On a whim, we stopped at the Goodwill near our home. I had just been there with little luck but I wanted to walk some of the food off and, it was on the way home. As soon as we walked in, there were our good friends and avid thrifters, the Merrill's. I didn't expect to find much so I took my time chatting with them.

When I finally pulled away, and did my three times around, I came away with a pretty good stash of different stuff.

This cute bunny is a bank. She is flocked and has the cutest little face. I cannot resist items that trigger memories from things I may have had during childhood. So sweet to put in a child's Easter basket.


Available

These peg coat racks are always a great find and a great seller. I have never seen a whitewashed one though so this is unique to my shop.

 
Available


I could not believe my eyes when I found this next item at the Goodwill. It is a wooden lap desk painted in a gorgeous aqua. It is quite distressed and chippy. Perfect! It has a medallion on the lid that starts with L and ends with "ess". Other than that I cannot make out what it says.  I thought about trying to redo the top but quickly talked myself out of it. A great DIYer I am not!


Available

Another item I thought about upcycling is this vintage cutting board. I never turned it over until I got home and that is when I saw the carved sunflowers! I originally thought to stencil the plain side. In the end I decided to let the buyer decide what to do with it. I kind of like it's rustic, retro look.


Available


This vanity mirror is another item I could not believe I was seeing at the Goodwill. It actually caught my breath as I was running to grab it! I knew it was a Syroco the minute I saw it's lovely gold finish.


Available


It is marked 1949 and a perfect décor piece for Victorian or Hollywood Regency style. Hmm, I may have to keep it awhile on my parlor mantel.


This sweet Shaker style bench or settee is doll sized. I own two others very similar to this from the 1980's. That is the only way I am selling this one!


Available


I learned sewing when I was about 12. My mother was a seamstress and I am sure my grandmothers were too. Never have I seen one of these vintage hem markers. This one is from the David Traum Co. Inc. from the 1950's. I was so intrigued by the fact that you could pin the hem right through the openings on the adjustable marker. Such technology!


Available


This last item and the first one of the post, the Zenith radio, were given to me by my 85 year old friend Fred. He was a real cigar smoker in his younger days. This is the second Humidor he has given to me to sell.


Both items are great vintage finds but need to be cleaned up and given a coat of wax finish before they are saleable. I just love that Fred thinks of me and that I know his stuff is the real thing!


I will chalk that trip up to a successful thrift on a whim. They are not always like that.


I have to keep my fingers crossed for another one to come along!


AnnMarie xoxo


I am linking up with these great blog parties:
Thrifty and Vintage Finds
Let's Talk Vintage
Talk of the Town
Share Your Cup
Roses of Inspiration
Vintage Charm Party
BTTCG Blog Party
Best of the Weekend
Simple and Sweet Fridays
Anything Goes Pink Saturday
Vintage Bliss Tuesdays Linky Party